

If you have spent weeks building a REST API in Node.js, the final hurdle—deploying it to production—often feels like stepping off a cliff.
Historically, junior developers deploy by dragging files over FTP, running node server.js in a tmux session, and hoping the server never reboots. As a sysadmin who has debugged hundreds of crashed servers at 3 AM, I can promise you: that approach will end in disaster.
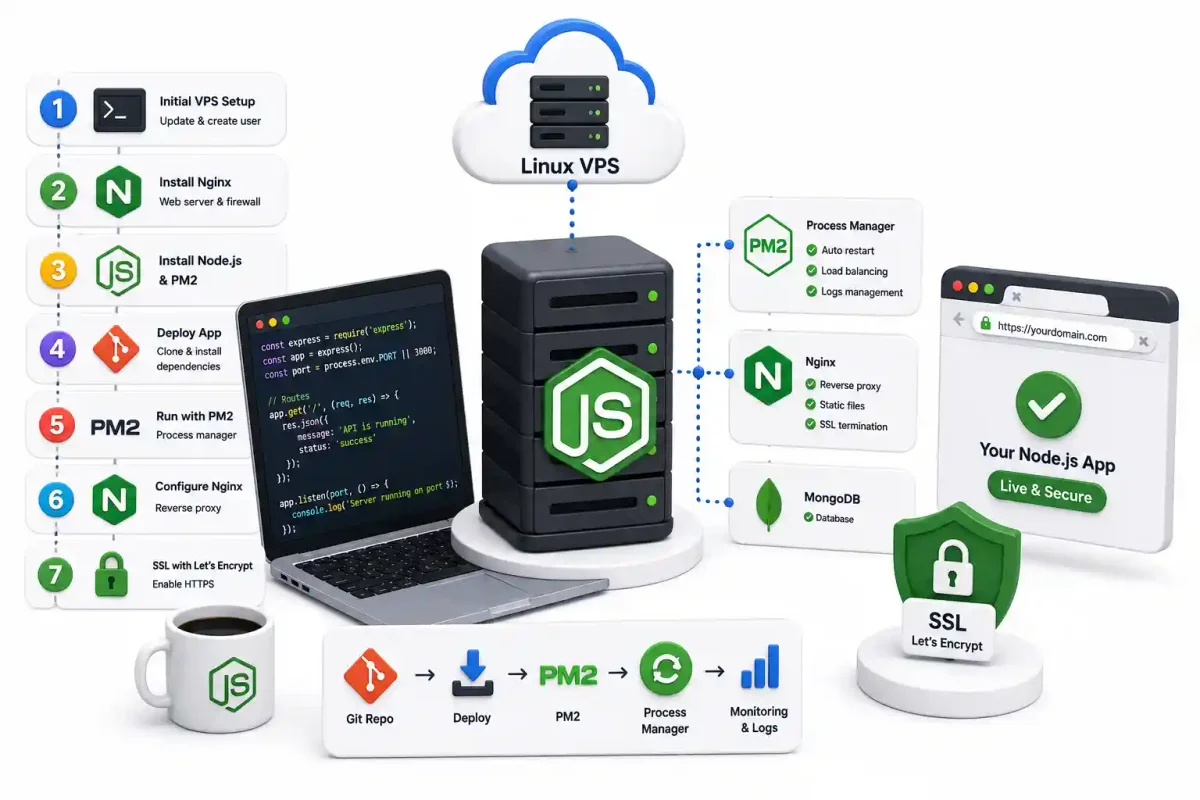
In 2026, deploying a production Node.js application to a Linux VPS requires a strict, repeatable architecture. You must isolate the process with PM2 or systemd, route traffic through a reverse proxy like Nginx or Traefik, enforce strict TLS encryption using Certbot, and harden the host using a firewall.
This is a complete, step-by-step DevOps guide to deploying Node.js on a raw Ubuntu or Debian VPS. No skipped steps. No fragile hacks.
Step 1: Provision and Harden the Linux VPS
Before we touch any Node.js code, we must lock down the host. A raw VPS exposed to the public internet will be scanned by malicious bots within 60 seconds of booting.
1.1 Initial Access and User Creation
Log into your VPS (whether it is an AWS EC2 instance, a Hetzner cloud server, or a VM inside your Proxmox VE home lab) as root:
ssh root@your-server-ipNever run application code as root. We need a dedicated deployment user with strict Linux file permissions:
# Create a deployment user
adduser deploy
# Grant sudo privileges
usermod -aG sudo deploy
# Switch to the new user
su - deploy
1.2 SSH Keys and Firewall Hardening
Before logging out, configure secure SSH access using ed25519 keys, and disable password authentication entirely in /etc/ssh/sshd_config.
Next, configure the Uncomplicated Firewall (UFW). See our UFW firewall guide for deeper details.
sudo ufw default deny incoming
sudo ufw default allow outgoing
sudo ufw allow 22/tcp  # SSH
sudo ufw allow 80/tcp  # HTTP
sudo ufw allow 443/tcp # HTTPS
sudo ufw enable
To automatically ban IPs attempting to brute-force your SSH port, install Fail2ban or CrowdSec immediately.
Step 2: Install the Application Stack
2.1 Install Node.js
Instead of using outdated apt repositories, use NodeSource to install a modern LTS release of Node.js and npm:
curl -fsSL https://deb.nodesource.com/setup_20.x | sudo -E bash -
sudo apt install -y nodejs build-essential
(Note: If your team prefers pnpm or yarn, install them globally now).
2.2 Install PM2 (Process Manager)
Node.js is single-threaded. If a fatal exception occurs, the process dies. PM2 acts as a daemon process manager that monitors your application, restarts it upon crashing, and utilizes Linux memory management efficiently.
sudo npm install -g pm2Step 3: Clone and Configure the Application
3.1 Fetch the Source Code
Generate an SSH deployment key on your server and add it to your GitHub repository (refer to our Git and GitHub guide for auth setups).
# Clone the repository into a dedicated directory
mkdir ~/apps
cd ~/apps
git clone [email protected]:yourusername/your-api.git
cd your-api
npm install --production
3.2 Secure Environment Variables
Never commit .env files to version control. Create it manually on the server:
nano .envPopulate it with your production secrets (e.g., your PostgreSQL or MySQL database URIs, or Redis caching strings). Restrict permissions to ensure only the deploy user can read it:
chmod 600 .env3.3 Configure PM2 Ecosystem
Create an ecosystem.config.js file in your app root. This tells PM2 exactly how to run your application across multiple CPU cores:
module.exports = {
  apps: [{
    name: 'production-api',
    script: './dist/server.js',
    instances: 'max',       // Run across all available CPU cores
    exec_mode: 'cluster',   // Enable cluster mode load balancing
    watch: false,
    max_memory_restart: '1G',
    env_production: {
      NODE_ENV: 'production',
      PORT: 3000
    },
    error_file: '/var/log/pm2/api-error.log',
    out_file: '/var/log/pm2/api-out.log',
    time: true
  }]
};
Start the application and configure PM2 to resurrect it if the Linux boot process restarts the server:
pm2 start ecosystem.config.js --env production
pm2 save
pm2 startup
# Run the sudo command that PM2 outputs to the terminal
Step 4: Configure Nginx as a Reverse Proxy
Node.js should never listen directly on port 80 or 443. We place Nginx in front of it to handle TLS termination, buffer slow clients, and serve static assets. (Alternatively, you could use Caddy or an Nginx Proxy Manager docker container, but raw Nginx offers the most control).
sudo apt install -y nginx
sudo nano /etc/nginx/sites-available/api.yourdomain.com
Insert the reverse proxy configuration:
server {
    listen 80;
    server_name api.yourdomain.com;

    location / {
        proxy_pass http://127.0.0.1:3000;
        proxy_http_version 1.1;
        proxy_set_header Upgrade $http_upgrade;
        proxy_set_header Connection 'upgrade';
        proxy_set_header Host $host;
        proxy_cache_bypass $http_upgrade;

        # Forward client IP data to Node.js
        proxy_set_header X-Real-IP $remote_addr;
        proxy_set_header X-Forwarded-For $proxy_add_x_forwarded_for;
    }
}
Enable the configuration and restart Nginx:
sudo ln -s /etc/nginx/sites-available/api.yourdomain.com /etc/nginx/sites-enabled/
sudo nginx -t
sudo systemctl restart nginx
Step 5: Secure the Connection with TLS (Let’s Encrypt)
Serving traffic over plain HTTP is a massive security violation. We must encrypt the traffic using Certbot and Let’s Encrypt. (For a deeper dive into TLS, see our guide on enabling HTTPS).
sudo apt install -y certbot python3-certbot-nginx
sudo certbot --nginx -d api.yourdomain.com
Certbot will automatically modify your Nginx configuration, provision the SSL certificates, and set up a systemd timer to renew them automatically before they expire.
Step 6: Logging, Monitoring, and Automation
A deployment is not finished until you can monitor it.
6.1 Log Management
Over time, PM2 logs will fill your disk. Install the pm2-logrotate module to automatically compress and rotate logs (similar to how Linux handles /var/log via logrotate—see Linux logs explained):
pm2 install pm2-logrotate
pm2 set pm2-logrotate:max_size 50M
pm2 set pm2-logrotate:retain 7
6.2 CI/CD Automation (GitHub Actions)
Manually SSHing into a server to run git pull is tedious. Automate it. Create a workflow file in your repository (.github/workflows/deploy.yml):
name: Deploy Node.js App

on:
  push:
    branches: [ main ]

jobs:
  deploy:
    runs-on: ubuntu-latest
    steps:
    - name: Execute SSH Commands
      uses: appleboy/[email protected]
      with:
        host: ${{ secrets.SERVER_IP }}
        username: deploy
        key: ${{ secrets.SSH_PRIVATE_KEY }}
        script: |
          cd ~/apps/your-api
          git pull origin main
          npm install --production
          pm2 reload production-api --update-env
Now, every time you push to the main branch, GitHub Actions (or GitLab CI) will securely deploy your code with zero downtime.
Moving to Containers (The Next Step)
While deploying directly to a bare-metal VPS is an excellent learning experience, modern infrastructure leans heavily toward containerization. Once your app grows, consider wrapping it in a Docker image.
By utilizing Docker Compose and keeping your application isolated in secure Docker containers, you can easily orchestrate deployments using advanced tools like Coolify or DokPloy.
Official Documentation
For deep technical insights into these deployment tools, refer to the official documentation:
- Node.js Production Best Practices: https://nodejs.org/en/docs/guides/nodejs-docker-webapp
- PM2 Process Management: https://pm2.keymetrics.io/docs/usage/pm2-doc-single-page/
- Nginx Reverse Proxy Setup: https://docs.nginx.com/nginx/admin-guide/web-server/reverse-proxy/
- Let’s Encrypt / Certbot: https://certbot.eff.org/
- GitHub Actions CI/CD: https://docs.github.com/en/actions
Frequently Asked Questions (FAQ)
Why should I use Nginx instead of letting Node.js listen on port 80?
Node.js is extremely fast at processing application logic, but it is not optimized for handling TLS/SSL termination, buffering slow client requests, or serving static files. Nginx acts as a high-performance reverse proxy that absorbs network anomalies and protects your Node.js process from malicious direct traffic.
What is the difference between PM2 and systemd?
Both can manage daemon processes. systemd is native to Linux and integrates perfectly with system logs and boot processes. PM2 is specifically designed for Node.js, offering built-in cluster mode (load balancing across CPU cores), zero-downtime reloads, and easy log viewing without needing to parse journalctl.
How do I update my Node.js application after deployment?
If you are not using an automated CI/CD pipeline, SSH into your server, navigate to the application directory, run git pull to fetch the latest code, run npm install to update any dependencies, and then execute pm2 reload <app-name> for a zero-downtime restart.
How do I troubleshoot a 502 Bad Gateway error?
A 502 Bad Gateway means Nginx is running, but it cannot communicate with your Node.js app. First, check if your app crashed by running pm2 status. Then, check the Nginx error logs (sudo tail -f /var/log/nginx/error.log) to confirm that Nginx is proxying traffic to the correct internal port.
Should I commit my .env file to GitHub?
Absolutely never. .env files contain highly sensitive secrets like database passwords and API keys. Committing them to version control can result in immediate security breaches. Always .gitignore the file and recreate it manually on the production server.
What is PM2 Cluster Mode?
Node.js is single-threaded, meaning it normally only utilizes one CPU core. PM2’s cluster mode allows you to spawn multiple instances of your application (usually one per CPU core) and automatically load-balances incoming HTTP requests across all instances, dramatically increasing throughput.
How do I secure my VPS deployment?
Always use key-based SSH authentication (disable password logins), configure a strict UFW firewall allowing only ports 22, 80, and 443, install Fail2ban to prevent brute-force attacks, and keep your Ubuntu/Debian server patched using apt update && apt upgrade.
Can I run multiple Node.js apps on a single VPS?
Yes. You can start multiple applications on different internal ports (e.g., App A on 3000, App B on 3001) using PM2. Then, configure separate Nginx server blocks (virtual hosts) to route different domain names (e.g., api1.com and api2.com) to their respective internal ports.
Is Docker better than PM2 for deploying Node.js?
Containerization (Docker) is the modern industry standard because it guarantees environment parity between your local machine and the production server. However, PM2 on a bare VPS is simpler for absolute beginners and has slightly less computational overhead for very small instances.
How do I automate my database migrations during deployment?
If you are using an ORM like Prisma or Sequelize, you can add your migration scripts directly to your GitHub Actions pipeline (e.g., npx prisma migrate deploy) right before the pm2 reload step, ensuring your database schema is always in sync with your application code.
Discussion
Loading comments...