

If you are a sysadmin debugging a broken REST API, or a DevOps engineer wondering why your Docker containers are dropping connections, understanding HTTP is non-negotiable.
For many developers, HTTP (Hypertext Transfer Protocol) is just a prefix typed into a browser. But from an infrastructure perspective, HTTP is the complex, highly orchestrated language that dictates how data moves between your reverse proxies, application servers, and end users.
In this guide, we will strip away the “black box” mystery of web protocols. We will dissect the exact sequence of events that occurs when an HTTP request hits a Linux VPS, how headers control caching, and why modern web architecture relies so heavily on HTTP multiplexing.
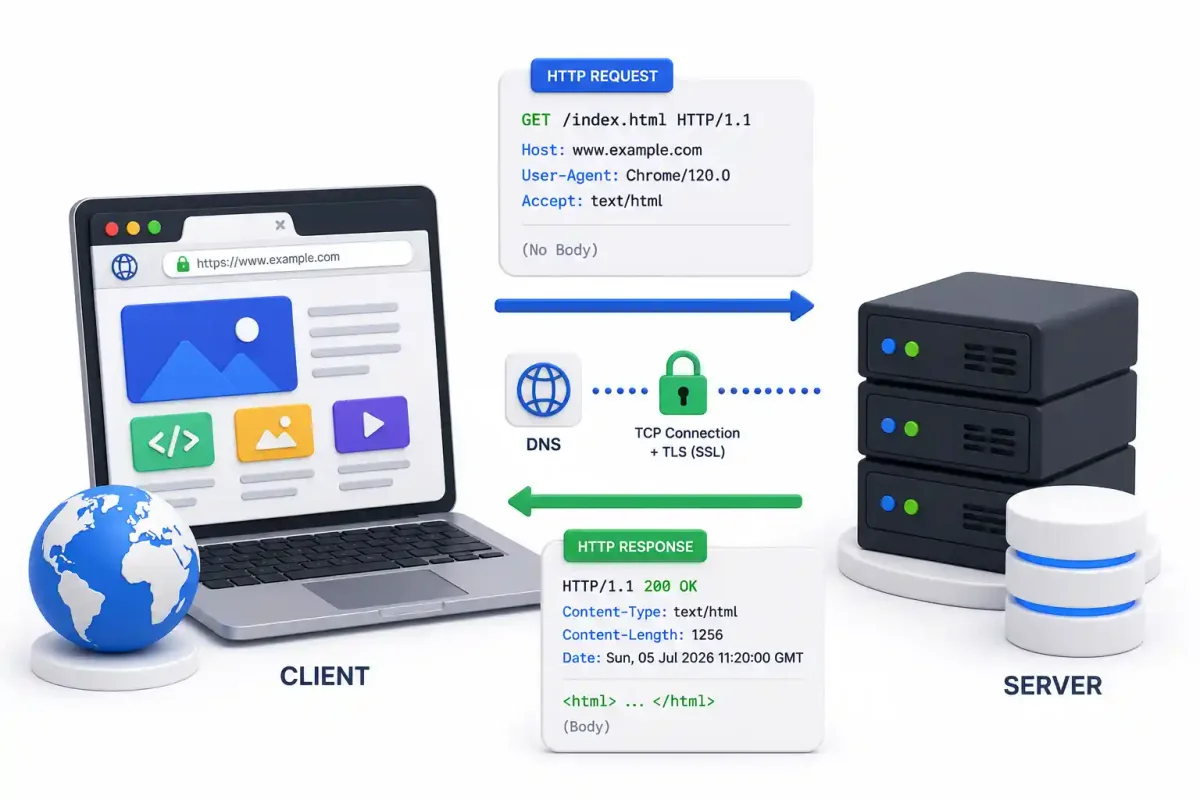
1. The Anatomy of a Web Request
When you execute a cURL command in the terminal or ping an API endpoint, you are initiating a highly structured sequence of network events.
Step 1: The DNS Resolution
Before an HTTP request can leave your machine, the client must resolve the domain name. It queries a DNS server using the UDP protocol (which is stateless and extremely fast) to resolve a domain like api.example.com into an IPv4 or IPv6 address. (For a deep dive, see how DNS works for beginners). You can debug this locally using tools like dig or nslookup.
Step 2: The TCP Handshake
HTTP natively sits on top of TCP (Transmission Control Protocol). TCP ensures that data packets arrive sequentially and without corruption. The client and server perform a 3-way handshake (SYN, SYN-ACK, ACK). If your server’s UFW firewall or iptables is misconfigured, the connection is instantly dropped right here, resulting in a timeout.
Step 3: The TLS Handshake (HTTPS)
In 2026, raw HTTP (port 80) is practically dead; everything is encrypted via HTTPS (port 443). Once TCP is established, the client and server negotiate encryption using TLS (Transport Layer Security). As a system administrator, you must provision these cryptographic keys. The industry standard is deploying Certbot to fetch automated, free Let’s Encrypt certificates.
2. The Core Conversation: Request and Response
Once the TLS tunnel is established, the actual HTTP conversation begins. HTTP is entirely stateless. Every single request is treated as a completely isolated transaction.
The HTTP Request
An incoming HTTP request hitting your Nginx Proxy Manager or Traefik instance looks like plain text. It contains:
- The Request Line: The HTTP method (e.g.,
GET,POST), the path (e.g.,/api/users), and the protocol version (HTTP/1.1orHTTP/2). - Headers: Critical metadata.
- Body: The payload (usually JSON, XML, or form data).
Example Request:
GET /api/status HTTP/1.1
Host: api.example.com
User-Agent: curl/8.5.0
Accept: application/json
Authorization: Bearer eyJhbGciOiJIUzI1Ni...
The HTTP Response
Your backend (perhaps a Node.js or Golang server) processes the logic and returns a response containing a Status Line, Headers, and the Body.
Example Response:
HTTP/1.1 200 OK
Server: nginx/1.24.0
Content-Type: application/json
Cache-Control: max-age=3600
X-Frame-Options: DENY

{"status": "healthy", "uptime": 45000}
3. Understanding HTTP Status Codes in Production
When monitoring infrastructure in Grafana or Datadog, HTTP status codes are your primary health indicators.
- 2xx (Success): Everything is healthy. The request reached the backend and was successfully processed.
- 3xx (Redirection): The resource has moved.
301 Moved Permanentlyis critical for SEO, while302 Foundis used for temporary redirects (like sending unauthenticated users to a login page). - 4xx (Client Errors):
400 Bad Request: The client sent malformed JSON.401 Unauthorized: The JWT token is missing or invalid.403 Forbidden: The client is authenticated but lacks permission (e.g., modifying Linux file permissions withoutsudo).404 Not Found: The route does not exist.429 Too Many Requests: The client has hit a rate limit (often enforced by tools like Fail2ban or CrowdSec).
- 5xx (Server Errors): This triggers pager alerts.
500 Internal Server Error: Your application code crashed (e.g., a fatal Python exception).502 Bad Gateway: Nginx received an invalid response from an upstream server (e.g., your Docker container died).503 Service Unavailable: The server is deliberately down for maintenance or overwhelmed.
If you are using Uptime Kuma to monitor your homelab, it constantly pings your services checking for that golden 200 OK.
4. Reverse Proxies and Caching Strategies
In a modern architecture deployed via Coolify or Portainer, a client almost never talks directly to your application code. They talk to a Reverse Proxy.
A Reverse Proxy (like Nginx, Caddy, or HAProxy) sits at the edge of your network. It handles TLS termination, meaning it decrypts the HTTPS traffic, and then forwards raw HTTP traffic internally to your backend microservices.
The Power of Caching
If your server receives 10,000 requests a second for the same image or database payload, routing every request to your backend will cause your CPU to catch fire. This is why we use HTTP Caching via headers.
When the proxy sends a response, it can attach a Cache-Control header.
Cache-Control: public, max-age=86400: Instructs downstream caches (like Cloudflare CDNs or the user’s browser) to store this payload for 24 hours. The request never hits your server again.Cache-Control: no-store: Instructs caches to never store the response, mandatory for highly sensitive data like billing information.
For dynamic caching, backend engineers often use highly optimized memory caches like Redis or Memcached instead of relying purely on HTTP caching, especially when dealing with heavy relational databases like PostgreSQL or MySQL.
5. Security: HTTP Headers as a Defense Layer
Security isn’t just about securing SSH access or enforcing strict Linux filesystem boundaries. The HTTP headers your server returns are critical for protecting clients against malicious attacks.
When configuring your web server, you must inject security headers:
Strict-Transport-Security (HSTS): Forces browsers to only communicate with your server over HTTPS.Content-Security-Policy (CSP): Prevents Cross-Site Scripting (XSS) by dictating exactly which domains are allowed to execute JavaScript.X-Frame-Options: DENY: Prevents your site from being embedded in an invisible iframe on a malicious site (Clickjacking).
If you deploy applications across distributed Proxmox VE clusters, ensuring these headers are uniform across all load balancers is essential.
6. The Evolution: HTTP/1.1 vs HTTP/2 vs HTTP/3
HTTP is not static; it has evolved drastically to solve latency issues.
- HTTP/1.1 (1997): Text-based. It suffered from “head-of-line blocking.” A browser had to open multiple, expensive TCP connections just to download a CSS file and a JavaScript file simultaneously.
- HTTP/2 (2015): Binary-based. Introduced Multiplexing. A browser can download dozens of files simultaneously over a single TCP connection, drastically improving load times. It also introduced server push and header compression.
- HTTP/3 (2022): The radical shift. HTTP/3 ditches TCP entirely and runs over QUIC (which sits on top of UDP). This drastically reduces latency, especially on mobile networks where users constantly switch between Wi-Fi and 5G cellular towers without dropping the connection.
Conclusion
HTTP is the absolute foundation of the modern internet. Whether you are debugging Linux boot processes, inspecting packets with tcpdump, or configuring internal routing meshes with Tailscale or WireGuard, the underlying traffic is almost exclusively HTTP.
By mastering the Request/Response cycle, understanding how headers dictate caching and security, and analyzing status codes for debugging, you transition from a beginner developer into an engineer capable of designing robust, scalable infrastructure.
For further reading on how data moves securely, explore our guide on VPN concepts and how to configure UFW firewalls to protect your web servers.
Official Documentation
For deep dives into protocol specifications, debugging tools, and web server configurations, consult these official resources:
- Mozilla Developer Network (MDN) HTTP Basics: https://developer.mozilla.org/en-US/docs/Web/HTTP
- RFC 9110 (HTTP Semantics): https://www.rfc-editor.org/rfc/rfc9110.html
- Nginx Reverse Proxy Documentation: https://nginx.org/en/docs/http/ngx_http_proxy_module.html
- cURL Command Line Tool: https://curl.se/docs/manpage.html
- Wireshark Network Protocol Analyzer: https://www.wireshark.org/
Frequently Asked Questions (FAQ)
What does HTTP actually stand for?
HTTP stands for Hypertext Transfer Protocol. It is the standardized, application-layer protocol used for transmitting hypermedia documents, such as HTML, JSON, and media, across the World Wide Web.
What is the fundamental difference between HTTP and HTTPS?
HTTPS is the secure version of HTTP. It wraps the standard HTTP protocol inside a cryptographic tunnel (TLS or SSL) to encrypt the data packet. This prevents man-in-the-middle (MITM) attacks and ensures data integrity between the client and the reverse proxy.
Why is HTTP known as a stateless protocol?
HTTP is considered stateless because the server handles every request as a completely independent transaction. The server retains no memory of previous requests from the same client, which is why developers must use Cookies, Sessions, or JWTs to maintain application state.
What is a Reverse Proxy and why is it important for HTTP?
A Reverse Proxy (like Nginx or HAProxy) sits in front of application servers and intercepts incoming HTTP requests. It handles SSL/TLS termination, load balancing, caching, and security filtering, drastically reducing the load on the internal backend servers.
What does an HTTP 502 Bad Gateway error indicate?
A 502 Bad Gateway indicates that an edge server (like Nginx) successfully received the request but received an invalid response from the upstream backend server (e.g., your Node.js or Docker container crashed, timed out, or refused the connection).
How do HTTP Headers improve web security?
HTTP response headers dictate how a browser behaves. Headers like Strict-Transport-Security (HSTS) force encrypted connections, while Content-Security-Policy (CSP) strictly limits where the browser is allowed to load external scripts, mitigating XSS attacks.
What is the purpose of the HTTP Cache-Control header?
The Cache-Control header instructs browsers and intermediate CDNs (like Cloudflare) on whether they are allowed to store a local copy of a resource, and for how long. Proper caching drastically reduces bandwidth costs and improves TTFB (Time to First Byte).
How did HTTP/2 improve upon HTTP/1.1?
HTTP/2 introduced multiplexing, allowing a single TCP connection to download multiple assets concurrently. It also shifted from a text-based format to a binary framing layer and introduced header compression, significantly improving load speeds for asset-heavy websites.
What is HTTP/3 and why does it use UDP?
HTTP/3 replaces TCP with the QUIC protocol, which runs over UDP. Because UDP does not require a complex multi-step handshake for error correction like TCP does, HTTP/3 establishes secure connections much faster and handles packet loss significantly better on unstable mobile networks.
How can I inspect raw HTTP traffic on a Linux server?
Sysadmins frequently use tools like cURL -v for verbose request analysis, tcpdump for packet sniffing at the network interface level, or advanced protocol analyzers like Wireshark to dissect exact header payloads and TLS handshakes.



Discussion
Loading comments...