

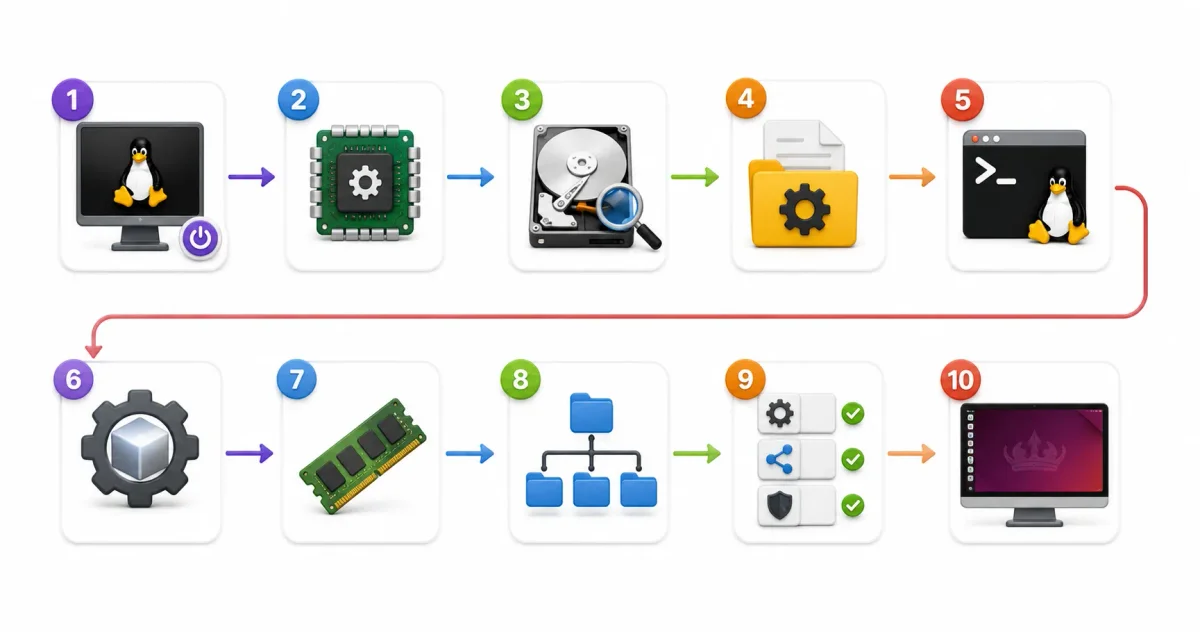
For the vast majority of computer users, the time between pressing the physical power button and the appearance of a graphical login screen is just a few seconds of idle waiting. You watch a manufacturer’s logo flash, a spinning circle appear, and then you are ready to work.
But beneath the surface, those few seconds are an incredibly complex, violently fast relay race. A carefully orchestrated sequence of low-level hardware checks, firmware executions, and software handoffs must execute perfectly in a highly specific order. If a single baton is dropped during this relay, the system crashes, leaving you staring at a terrifying black screen filled with cryptic error messages.
Understanding the Linux Boot Process is not just trivia; it is a mandatory skill for any serious system administrator. It gives you the diagnostic power to look at a broken server, identify exactly which stage failed, and know exactly how to fix it.
In this comprehensive guide, we will break down the four major stages of the modern 2026 Linux boot sequence: Hardware Initialization (UEFI), The Bootloader (GRUB2), The Kernel, and The Init System (Systemd).
Stage 1: The Hardware Stage (UEFI / BIOS)
Before the Linux operating system can even begin to think about loading, the physical silicon inside your computer needs to wake up and check its own sanity. This is handled by firmware physically soldered onto your motherboard.
The POST (Power-On Self-Test)
The instant electricity hits the motherboard, the CPU executes a hardcoded instruction to run the POST. This is a rapid diagnostic check. It verifies that the CPU is functioning, the RAM is present and healthy, the keyboard is connected, and the hard drives are spinning. If you have ever heard a computer emit a loud series of “beeps” and refuse to turn on, that is the POST failing and crying out for help because hardware is broken or missing.
BIOS vs. UEFI
Historically, this phase was managed by the BIOS (Basic Input/Output System). BIOS was a 16-bit system from the 1980s that could only read a tiny 512-byte section at the very beginning of your hard drive, called the Master Boot Record (MBR).
In modern systems (and mandatory on almost all hardware sold after 2020), BIOS has been completely replaced by UEFI (Unified Extensible Firmware Interface).
- UEFI is a miniature operating system in its own right. It is 64-bit, supports a mouse, connects to networks, and understands complex hard drive partitions (specifically the GUID Partition Table, or GPT).
- Secure Boot: UEFI also introduced Secure Boot, a cryptographic signature check that ensures no malicious software (like a rootkit) has tampered with the boot sequence before the OS loads.
The Handoff
Once UEFI finishes its hardware checks, it looks for an EFI System Partition (ESP) on your hard drive. This is a small, FAT32-formatted partition containing bootloader applications. UEFI finds the specific .efi file for your Linux distribution (e.g., grubx64.efi) and executes it.
The hardware stage is now over. Control is passed to the software.
Stage 2: The Bootloader (GRUB2)
The bootloader is a highly specialized piece of software with one single job: find the massive Linux Kernel on the hard drive, load it into the computer’s RAM, and start it.
The undisputed king of Linux bootloaders is GRUB2 (GRand Unified Bootloader version 2).
What GRUB Does
When GRUB loads, it reads its configuration file (located at /boot/grub/grub.cfg). This file contains the locations of all the operating systems installed on your hard drive.
If you have a dual-boot setup (e.g., Windows 11 and Ubuntu), GRUB is the software that pauses the boot process and draws the menu on your screen, asking you which OS you want to boot into.
Passing Kernel Parameters
Before GRUB executes the kernel, it allows you to pass “Kernel Parameters” (or boot arguments) to it. These are instructions that alter how the kernel behaves.
quiet: Tells the kernel to hide all the scrolling text messages during boot and show a clean splash screen instead.nomodeset: A lifesaver for troubleshooting. It tells the kernel to ignore advanced Nvidia/AMD graphics drivers and use a basic, safe video mode.single: Boots the system into “single-user mode” (a root-level terminal with no networking), used for emergency password resets or fixing corrupted filesystems.
Once you select your OS, GRUB locates the compressed Linux Kernel file (usually named vmlinuz) and loads it into memory. GRUB’s job is done.
Stage 3: The Kernel and Initramfs
The Linux Kernel is the absolute core of the operating system. It is the bridge between the physical hardware (CPU, RAM, network cards) and the software applications.
Decompression and Initialization
The kernel is stored on the hard drive in a highly compressed state to save space. Its first action is to decompress itself in RAM. Once decompressed, it initializes the system’s memory, configures the CPU, and probes the system bus to see exactly what hardware is connected.
The Chicken and the Egg Problem: initramfs
Here, the boot process encounters a massive paradox.
To finish booting, the kernel must mount your main hard drive (the Root Filesystem, or /). However, your main hard drive might be formatted as ext4, or btrfs, or it might be encrypted with LUKS, or part of a complex RAID array.
To read the drive, the kernel needs the specific software drivers for btrfs or LUKS. But where are those drivers located? They are stored inside the very hard drive the kernel is trying to read. The kernel cannot read the drive without the drivers, and it cannot get the drivers without reading the drive.
The Solution
The solution is the initramfs (Initial RAM File System).
Alongside the kernel, GRUB also loads the initramfs file into memory. The initramfs is a tiny, temporary, virtual filesystem that exists only in RAM. It contains just enough essential drivers (SATA, NVMe, filesystem modules, decryption keys) to allow the kernel to unlock and mount the real hard drive.
Pivoting the Root
Once the real hard drive is successfully mounted, the kernel executes a command called pivot_root. The temporary initramfs is destroyed and flushed from memory, and the real hard drive officially becomes the root (/) of the filesystem.
Stage 4: The Init System (Systemd)
The kernel is now running, and the hard drive is mounted. However, the system is essentially brain-dead. There is no network connection, no firewall, no audio, no web server, and no graphical user interface.
To bring the system to life, the kernel executes the very first software program on the hard drive. Because it is the first program, it is always assigned Process ID 1 (PID 1). This program is called the Init System.
In 2026, virtually every major Linux distribution (Ubuntu, Red Hat, Arch, SUSE) uses Systemd as its Init System.
Bringing Order to Chaos
Systemd’s job is to read its configuration files (located in /etc/systemd/system/) and start all the background services (daemons) required for the OS to function.
Historically, older init systems (like SysVinit) started services sequentially—first the network, then wait for it to finish, then the firewall, then wait, then the database. This was incredibly slow. Systemd is fiercely complex because it starts services in parallel, analyzing dependencies on the fly to boot the system as fast as mathematically possible.
Reaching the Target
Systemd doesn’t just start everything at random; it attempts to reach a specific “Target” (which older systems called Runlevels).
multi-user.target: Systemd starts the network, the firewall, the SSH server, and standard CLI tools. It stops here. This is the target for headless cloud servers.graphical.target: Systemd does everything in multi-user, but then goes one step further and launches the Display Manager (like GDM or SDDM), which initializes the graphics card and paints the graphical login screen on your monitor.
The moment that login screen appears, the boot process is officially complete.
Deep Dive: GRUB2 Configuration Internals
Understanding GRUB2’s configuration anatomy is essential for any administrator who needs to add custom kernel parameters or fix a broken bootloader.
The Two-File System
GRUB2 separates its configuration into two layers:
/etc/default/grub— This is the human-friendly settings file that you edit./boot/grub/grub.cfg— This is the machine-generated file that GRUB actually reads. You should never edit this file directly; it is regenerated every time you runupdate-grub(orgrub2-mkconfig).
Key Variables in /etc/default/grub
# The menu timeout in seconds before the default entry auto-boots
GRUB_TIMEOUT=5

# The default OS to boot (0 = first entry)
GRUB_DEFAULT=0

# Kernel parameters passed to the boot entry
# 'quiet' hides boot messages, 'splash' shows a Plymouth splash screen
GRUB_CMDLINE_LINUX_DEFAULT="quiet splash"

# Parameters appended to ALL boot entries (including recovery mode)
GRUB_CMDLINE_LINUX=""
Adding a Custom Kernel Parameter
For example, to permanently enable Intel P-state scaling (useful for laptop battery life):
- Open the file:
sudo nano /etc/default/grub - Modify the line:
GRUB_CMDLINE_LINUX_DEFAULT="quiet splash intel_pstate=active" - Regenerate the
grub.cfg:sudo update-grub
To pass a parameter for just one boot (for testing), press e at the GRUB menu to enter the editor, navigate to the linux line, and append your parameter at the end of the line. Press Ctrl+X to boot with the temporary change.
MBR vs. GPT Partition Tables
When GRUB encounters a hard drive, the layout of the partition table determines how it operates.
| Feature | MBR (Legacy BIOS) | GPT (Modern UEFI) |
|---|---|---|
| Maximum Disk Size | 2 TB | 18 exabytes |
| Maximum Partitions | 4 primary | 128 primary |
| Boot Record Location | First 512 bytes of disk | Dedicated EFI System Partition (ESP) |
| Redundancy | None | Backup partition table at end of disk |
| Required for Secure Boot | No | Yes |
On modern hardware, GPT is always preferred. You can verify your disk’s partition table type using sudo fdisk -l /dev/sda and looking for either Disklabel type: dos (MBR) or Disklabel type: gpt.
Deep Dive: initramfs Generation and Tooling
The initramfs is not a static file; it is dynamically generated by tools on your system and customized for your specific hardware configuration.
How initramfs Is Built
On Ubuntu/Debian systems, the initramfs is generated by the initramfs-tools package. On RHEL/Fedora/Arch, a more modern tool called dracut is used.
After installing a new kernel package, these tools automatically run a “hook” system. Each installed package that needs to be included at early boot (like the cryptsetup package for full-disk encryption, or mdadm for RAID arrays) registers a hook script. The tool runs all hooks, collects the required binaries and kernel modules, and packages everything into a compressed archive.
# Manually regenerate the initramfs for the currently running kernel (Ubuntu)
sudo update-initramfs -u -k $(uname -r)

# Regenerate for ALL installed kernels
sudo update-initramfs -u -k all

# Using dracut (RHEL/Fedora)
sudo dracut --force
What Lives Inside initramfs
You can inspect the contents of your initramfs to understand exactly what it includes:
# The initramfs is a compressed CPIO archive; list its contents
lsinitramfs /boot/initrd.img-$(uname -r) | head -50
A typical initramfs contains:
- Core kernel modules (SATA/NVMe drivers, filesystem drivers like
ext4.koandbtrfs.ko) - A minimal shell (
busybox) - The
udevdaemon for device detection cryptsetupif full-disk encryption is enabled- The
pivot_rootandmountutilities
Deep Dive: Systemd Targets and the Dependency Graph
Systemd Targets are not just sequential runlevels; they represent a declarative dependency graph. Each service unit file (.service) declares what it Requires, Wants, and must come After or Before. Systemd resolves this graph and executes units in the correct order, parallelizing everything it safely can.
The Critical Target Chain
sysinit.target
    └── basic.target
            └── multi-user.target
                    └── graphical.target
Each target in this chain Requires the one before it, creating the safe sequential envelope within which parallel services are launched.
Viewing Active Services and Their Status
# Show all active units sorted by when they were activated
systemctl list-units --type=service --state=active

# Show the dependency tree of a specific target
systemctl list-dependencies graphical.target

# Check which target the system booted to
systemctl get-default

# Temporarily change the boot target (no reboot needed)
sudo systemctl isolate multi-user.target

# Permanently set the default boot target (e.g., to disable GUI on a server)
sudo systemctl set-default multi-user.target
Analyzing and Optimizing Boot Time
Systemd provides a built-in performance profiler for your boot sequence. If your system boots slowly, this is the first tool to use.
# Display the total boot time breakdown (firmware + kernel + userspace)
systemd-analyze

# Show every service unit and how long each one took to initialize
systemd-analyze blame

# Generate a full SVG visualization of the boot timeline (open in a browser)
systemd-analyze plot > boot-timeline.svg
The blame output typically reveals a handful of services responsible for 80% of your boot delay. Common culprits include NetworkManager-wait-online.service (which waits for a full network connection before proceeding) and snapd.service. You can safely disable non-essential services using sudo systemctl disable servicename.service.
Troubleshooting Boot Failures
Because the process is broken into four distinct stages, troubleshooting becomes logical rather than guesswork.
- “No Bootable Device Found” / Black Screen: The failure is in Stage 1 (UEFI). The firmware cannot find the hard drive or the ESP partition. Check your BIOS boot order settings.
- “GRUB Rescue>” Prompt: The failure is in Stage 2 (Bootloader). GRUB loaded, but its configuration file is corrupted or missing. You will need to boot from a Live USB and reinstall GRUB.
- “Kernel Panic - Not syncing: VFS: Unable to mount root fs”: The failure is in Stage 3 (Kernel). The kernel booted, but the
initramfsis missing the correct drivers to read your hard drive. This often happens after a botched kernel update. - Hanging on a loading screen with a blinking cursor: The failure is in Stage 4 (Systemd). The kernel is fine, but a critical service (often the graphics driver) failed to start. You can press
Ctrl+Alt+F3to drop into a terminal and typesudo journalctl -bto read the exact error logs explaining why systemd failed.
Frequently Asked Questions About the Linux Boot Process
How do I boot into recovery mode?
When the GRUB menu appears, select the entry labeled “Advanced options for Ubuntu” (or your distro’s equivalent) and choose the “(recovery mode)” entry. This boots with the single kernel parameter, starting a minimal root shell without networking. This is the standard way to reset a forgotten root password or repair a broken filesystem.
How do I add a new operating system to the GRUB menu?
Install the new OS (e.g., Windows or a second Linux distro), then boot back into your primary Linux installation and run sudo update-grub. The os-prober tool will scan all partitions, detect the new OS’s boot entry, and automatically add it to grub.cfg.
What is the difference between initrd and initramfs?
They solve the same problem but implement it differently. initrd (Initial RAM Disk) is an older mechanism that used a loopback block device—essentially a virtual hard drive that the kernel mounted as a filesystem. initramfs is the modern replacement: it is a compressed CPIO archive that is directly extracted into a tmpfs (a virtual filesystem in RAM). initramfs is simpler, more flexible, and faster to process because there is no block device overhead.
Why does systemd boot faster than SysVinit?
The fundamental architectural difference is concurrency. SysVinit used sequential shell scripts—each service fully started before the next one could begin. Systemd uses Linux’s cgroups and socket activation. It can open the network socket for a service immediately (making it available to other services that depend on it) while the actual service process is still loading in the background. This allows dozens of services to start simultaneously.
How can I see exactly what kernel version is running?
# Show the running kernel version
uname -r

# Show all installed kernel versions available to boot
dpkg --list | grep linux-image

# Or on RPM-based systems
rpm -q kernel
Conclusion
The Linux boot process is a guide in modular software architecture. By decoupling the hardware checks (UEFI), the OS selection (GRUB2), the core engine (Kernel + initramfs), and the user services (Systemd), Linux creates an incredibly resilient system that can be paused, analyzed, and repaired at any step along the way.
The four-stage mental model—UEFI → GRUB2 → Kernel/initramfs → Systemd—transforms a black-screen error from a source of panic into a solvable engineering puzzle. Each stage leaves a fingerprint in the logs, giving you a precise trail to follow.
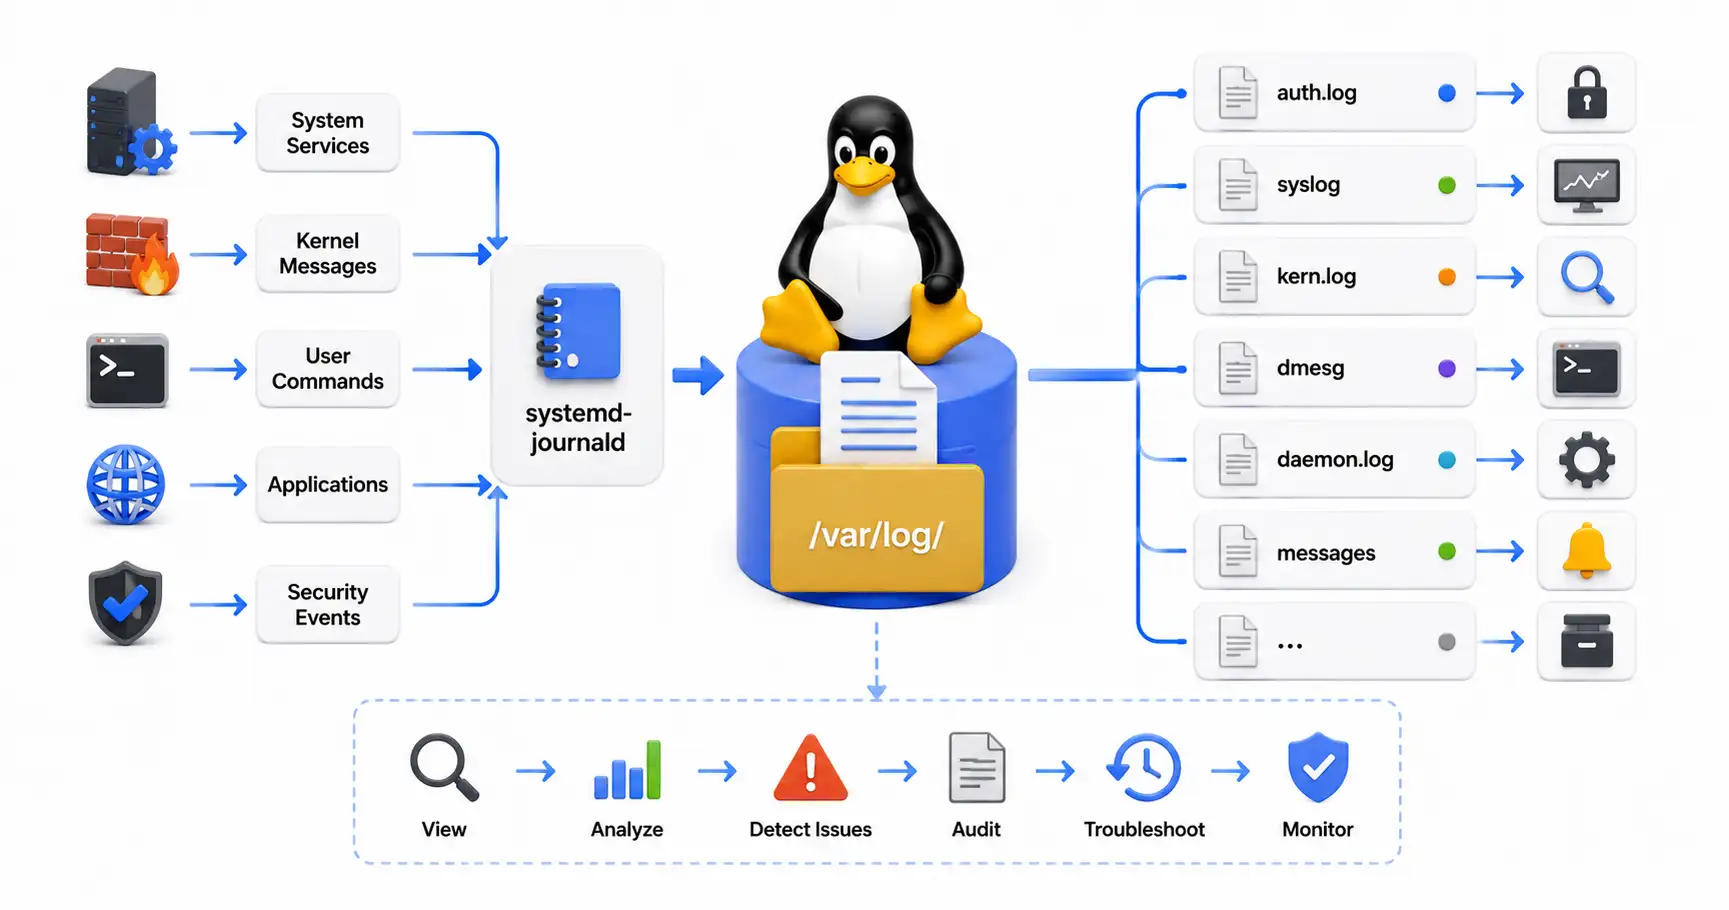
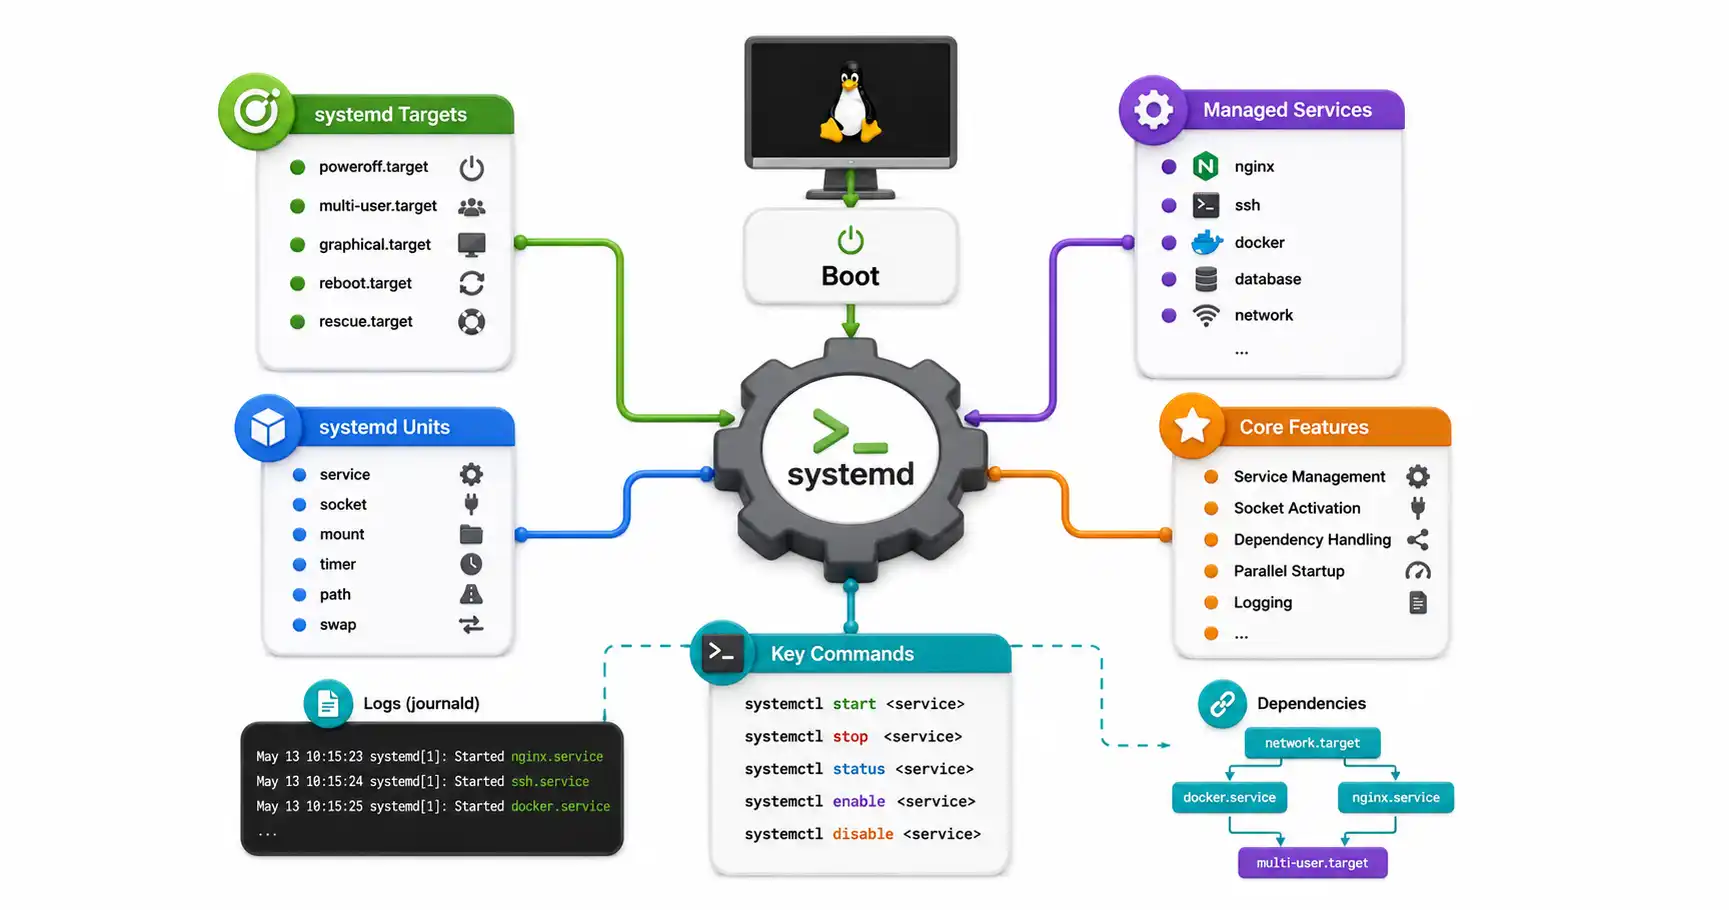
Ready to master the logs your system writes during this very process? Learn how to read and analyze Linux system logs or explore how systemd manages services after startup..

Discussion
Loading comments...